

I'm Turning Wrenches!
2 posters
Page 1 of 1
![]()
 I'm Turning Wrenches!
![]() Latrans Thu Apr 14, 2016 9:23 pm
Latrans Thu Apr 14, 2016 9:23 pm
I really don't expect any feedback, but I want to share anyways! This first post is actually a couple weeks old (and slightly modified) from where I dropped it over on theGSResourses.com forums.
So I picked this poor thing up from Craigslist for $300. Here's a video of it, several PO's ago. It's running, and while not pretty by motorcycle standards, is at least well taken care of by the guy filming. This link was included with the Craigslist post.
https://www.youtube.com/watch?v=F8fZ6jjL-OY
Here's a photo from the Craigslist post.
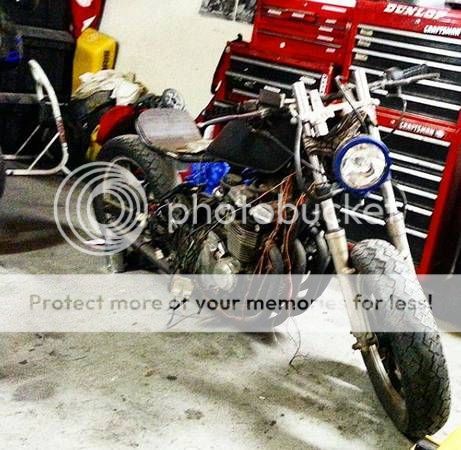
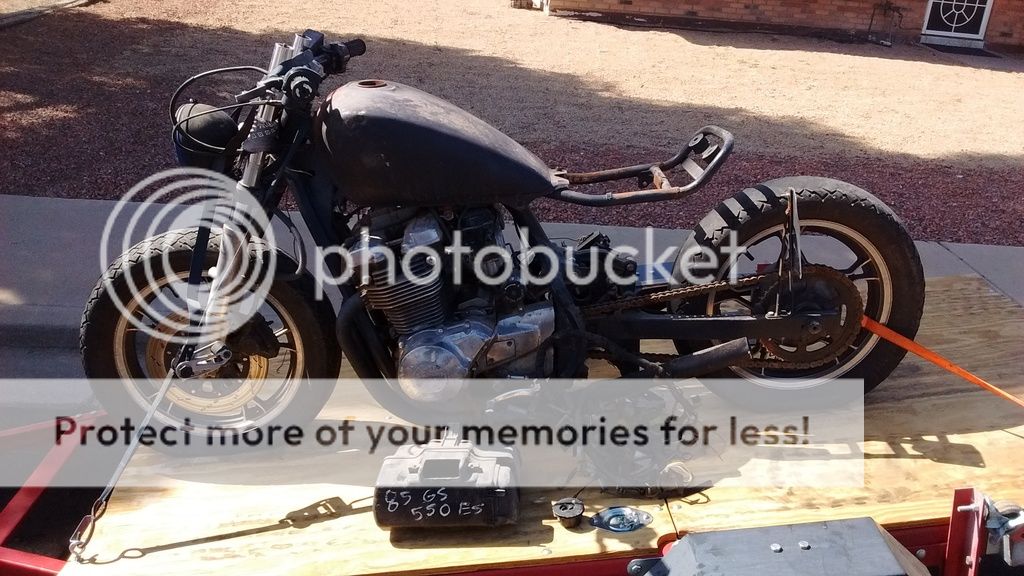
And these last two are from when my roommate got it home.
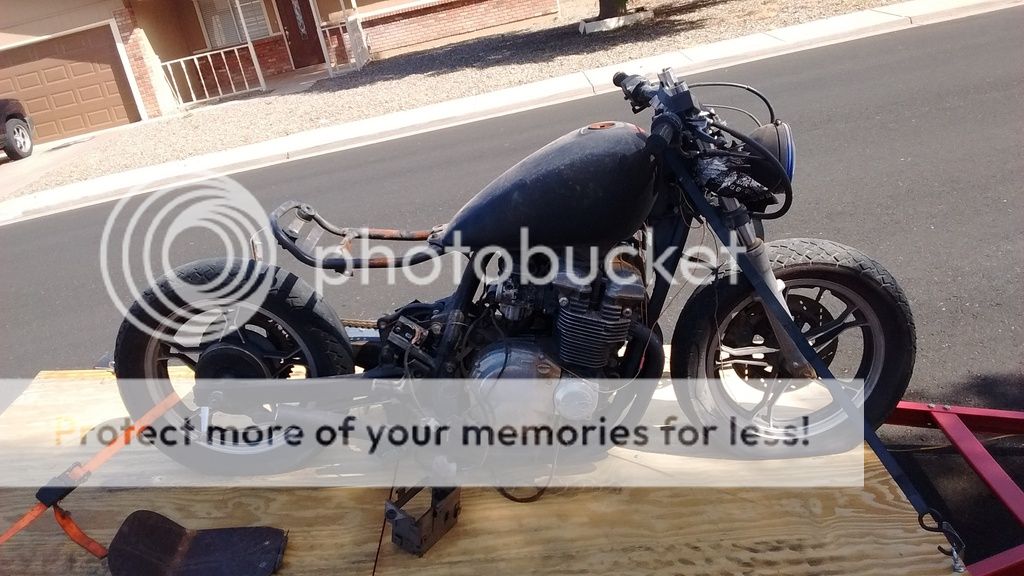
Just the change from the video to current should tell you how little the most recent PO knew about bikes and how ready he was to put that knowledge to use.
Changes I've noticed include, but are not limited to:
Different air box. The one on the trailer doesn't quite fit and is tagged as being off a GS550E.
Tank, fuel cap, headlight shroud, pipe tips and various other bits spray painted black... poorly.
Rear brake pedal is missing.
Brake light is missing.
Tank bushings are all missing.
Tank left to rust, heavily.
Fuel cap key is missing.
Mirror is gone.
Wiring harness is exploded (note wires hanging from the neck in the first picture).
Ignition box is smashed.
Numerous scrapes and road rash suggest it's been laid down at least once on each side.
Head light filament broken out and replaced by a bare bulb connected with hand-twisted wire.
Front forks raised through the triple trees several inches, kinking the clutch cable.
Starter switch replaced by an off-the-shelf push button.
Battery box replaced by a bent-up box from who-knows-where.
I may have payed too much for this thing...:p
And so I have a number of tasks ahead.
-Tires
I'm going back to the stock sizes. That oversized front wheel just doesn't do it for me.
-Seat
Going to fab up a couple pads to screw down to the diamond plate that is there now. I haven't decided if I want to put some seat springs in there as well.
-Wiring harness
I'm going to build one from scratch. I've already pulled all the wire off save for a starter motor lead, stater leads, ignition pickup leads, and regulator/rectifier lead. The stator leads will end up trimmed to fit with the r/r. The starter motor lead will be trimmed to fit wherever I end up putting the solenoid. And the ignition pickup leads will be replaced when I put in a Dyna S ignition. The rest of the bike will be pretty minimal. The busted headlight is getting replaced with a sealed unit and the missing tail light with a brake/turn signal combo. I'm putting a generic ignition switch in one of the fairing mount points on the triple trees. The stock controls should still be good for everything else (turn, high/low beams, starter). I'm using this wiring diagram as a basic guide and this stock diagram for details like making sure the Dyna gets hooked up right.
-Carbs
Between the missing airbox and trimmed exhaust I decided to go with pod filters and a re-jet. Following several recommendations, I'm putting in a Stage 3 kit from Dynajet. This is, of course, coupled with new float bowl gaskets from BikeBandit and o-rings from cycleorings.com. I don't have any way to start from a stock reference point for tuning them so I'm going to have some trial and error ahead of me. This carb specification chart is going to be my very good friend through these trying times.
-Engine
The motor seems to be in mostly decent shape save for a couple sheared side cover bolts and a layer of dust. The video noted that the engine bogged down at high RPMs and I see no reason to suspect that it ever got fixed. A little research pointed to worn valve springs to be the culprit so those will have to be replaced while the motor is out for cleaning. I'll also take the chance and check my valve gaps. To go with the Dyna S mod, I'll need to install a mechanical advance. There isn't much documentation on the difference between the Nippon Denso and Kokusan points and their respective mechanical advances so I'm hoping I purchased the right combo (DS3-1 kit and this advance). I should be able to get a couple of cover bolts from my local salvage yard to replace the two sheared ones.
-Fuel tank
For the moment, I'm letting the tank sit. If I acid wash the rust out now, it will just flash-rust on me before I can get gas in it. That stuff shows up fast. It happened within an hour last time I did it to a tank. From what I've heard, you can prevent this by following the acid wash with a splash of diesel to coat the metal, but haven't tried it and seems like a temporary solution at best. On the outside of the tank, I'll be giving it a sanding and repaint, but haven't decided what color yet. I've never used a spraygun before so this should be some good practice. I'm also replacing the trimmed and painted (with no key) cap with a stock lookalike. I won't know if I need to rebuild the petcock until I have fuel in the thing and can check for leaks.
-Frame
The frame seems structurally good in most places, but could use a good cleaning and repaint. My roommate (much better with a welder than I) will also be doing some work on the couple spots that look questionable and adding mounting points for the battery box, both of which will be on the seat area.
So I picked this poor thing up from Craigslist for $300. Here's a video of it, several PO's ago. It's running, and while not pretty by motorcycle standards, is at least well taken care of by the guy filming. This link was included with the Craigslist post.
https://www.youtube.com/watch?v=F8fZ6jjL-OY
Here's a photo from the Craigslist post.
And these last two are from when my roommate got it home.
Just the change from the video to current should tell you how little the most recent PO knew about bikes and how ready he was to put that knowledge to use.
Changes I've noticed include, but are not limited to:
Different air box. The one on the trailer doesn't quite fit and is tagged as being off a GS550E.
Tank, fuel cap, headlight shroud, pipe tips and various other bits spray painted black... poorly.
Rear brake pedal is missing.
Brake light is missing.
Tank bushings are all missing.
Tank left to rust, heavily.
Fuel cap key is missing.
Mirror is gone.
Wiring harness is exploded (note wires hanging from the neck in the first picture).
Ignition box is smashed.
Numerous scrapes and road rash suggest it's been laid down at least once on each side.
Head light filament broken out and replaced by a bare bulb connected with hand-twisted wire.
Front forks raised through the triple trees several inches, kinking the clutch cable.
Starter switch replaced by an off-the-shelf push button.
Battery box replaced by a bent-up box from who-knows-where.
I may have payed too much for this thing...:p
And so I have a number of tasks ahead.
-Tires
I'm going back to the stock sizes. That oversized front wheel just doesn't do it for me.
-Seat
Going to fab up a couple pads to screw down to the diamond plate that is there now. I haven't decided if I want to put some seat springs in there as well.
-Wiring harness
I'm going to build one from scratch. I've already pulled all the wire off save for a starter motor lead, stater leads, ignition pickup leads, and regulator/rectifier lead. The stator leads will end up trimmed to fit with the r/r. The starter motor lead will be trimmed to fit wherever I end up putting the solenoid. And the ignition pickup leads will be replaced when I put in a Dyna S ignition. The rest of the bike will be pretty minimal. The busted headlight is getting replaced with a sealed unit and the missing tail light with a brake/turn signal combo. I'm putting a generic ignition switch in one of the fairing mount points on the triple trees. The stock controls should still be good for everything else (turn, high/low beams, starter). I'm using this wiring diagram as a basic guide and this stock diagram for details like making sure the Dyna gets hooked up right.
-Carbs
Between the missing airbox and trimmed exhaust I decided to go with pod filters and a re-jet. Following several recommendations, I'm putting in a Stage 3 kit from Dynajet. This is, of course, coupled with new float bowl gaskets from BikeBandit and o-rings from cycleorings.com. I don't have any way to start from a stock reference point for tuning them so I'm going to have some trial and error ahead of me. This carb specification chart is going to be my very good friend through these trying times.
-Engine
The motor seems to be in mostly decent shape save for a couple sheared side cover bolts and a layer of dust. The video noted that the engine bogged down at high RPMs and I see no reason to suspect that it ever got fixed. A little research pointed to worn valve springs to be the culprit so those will have to be replaced while the motor is out for cleaning. I'll also take the chance and check my valve gaps. To go with the Dyna S mod, I'll need to install a mechanical advance. There isn't much documentation on the difference between the Nippon Denso and Kokusan points and their respective mechanical advances so I'm hoping I purchased the right combo (DS3-1 kit and this advance). I should be able to get a couple of cover bolts from my local salvage yard to replace the two sheared ones.
-Fuel tank
For the moment, I'm letting the tank sit. If I acid wash the rust out now, it will just flash-rust on me before I can get gas in it. That stuff shows up fast. It happened within an hour last time I did it to a tank. From what I've heard, you can prevent this by following the acid wash with a splash of diesel to coat the metal, but haven't tried it and seems like a temporary solution at best. On the outside of the tank, I'll be giving it a sanding and repaint, but haven't decided what color yet. I've never used a spraygun before so this should be some good practice. I'm also replacing the trimmed and painted (with no key) cap with a stock lookalike. I won't know if I need to rebuild the petcock until I have fuel in the thing and can check for leaks.
-Frame
The frame seems structurally good in most places, but could use a good cleaning and repaint. My roommate (much better with a welder than I) will also be doing some work on the couple spots that look questionable and adding mounting points for the battery box, both of which will be on the seat area.

Latrans- Posts : 976
Join date : 2011-03-29
Age : 40
Location : the quiet place with the matresses on the walls
![]()
![]()
Re: I'm Turning Wrenches!
![]() Latrans Thu Apr 14, 2016 9:38 pm
Latrans Thu Apr 14, 2016 9:38 pm
As I stated in the first post, I'm playing a bit of catch-up so here's a mashup of what's happened since that got posted.
I got bits in the mail!
https://img.photobucket.com/albums/v204/gundamzuki/Carb%20Bits.jpg
That is the re-jetting kit and new o-rings for the carbs.
Then I got more bits!
https://img.photobucket.com/albums/v204/gundamzuki/More%20Bits.jpg
That's a new fuel tank cap, tail/brake/turn combo light, 3" radiator hose to fab up some pod boots, valve springs, Dyna S ignition, clutch cable, blinker indicator, and throttle cable.
And a third set of bits!
https://img.photobucket.com/albums/v204/gundamzuki/Bits%20Mk%20III.jpg
Bondo (fill a couple dings in the tank. Bought locally, but included because reasons)
Rubber pads grommets and inserts for mounting the gas tank, mirror, foot pegs, float bowl gaskets (the last bit I needed before re-doing the carbs), and the ignition switch. Not pictured, but in my hands: mechanical advance.
I drew up a rough idea for the wiring harness...
https://img.photobucket.com/albums/v204/gundamzuki/Bobber%20Harness.jpg
I then re-drew the wiring diagram. I was going to do it in GIMP, but forgot it's not installed on my laptop, so I threw it together in MSPaint instead...
https://img.photobucket.com/albums/v204/gundamzuki/Bobber%20Harness%20Color.jpg
The red and green wires switch at the tail/brake light because the assembly has those as the colors in the pigtail which is opposite what I had been running for the rest of the bike.
I also probably could have made it a little less confusing with a couple more wire colors, but six colors is what I had, so six colors is what I drew.
Lastly, and just for kicks, here's my garage at the moment.
https://img.photobucket.com/albums/v204/gundamzuki/The%20Garage.jpg
No, none of them are road worthy... *sadface*
From left to right:
Honda Nighthawk 250 (crashed it a couple weeks ago and bent the forks)
Suzuki Marauder 750 (carb issues, sitting while my roommate buys it from a mutual friend)
Suzuki GS550L (the bike this thread is about)
Honda GL500 Silverwing (loose clutch, frozen thermostat)
Latrans- Posts : 976
Join date : 2011-03-29
Age : 40
Location : the quiet place with the matresses on the walls
![]()
![]()
Re: I'm Turning Wrenches!
![]() Ellen-Natalie Sun Apr 17, 2016 9:25 am
Ellen-Natalie Sun Apr 17, 2016 9:25 am
This is awesome, Latrans! I'd love to see how the finished bike turns out 

Ellen-Natalie- Posts : 2020
Join date : 2011-03-24
Age : 36 -

![]()
![]()
Re: I'm Turning Wrenches!
![]() Latrans Sun Apr 24, 2016 11:24 pm
Latrans Sun Apr 24, 2016 11:24 pm
Progress has been annoyingly slow, but that's largely due to being a weekend-only project and occasionally having my weekends taken up with family things (like my daughter's birthday).
Anyways, I finally got the bulk of the wiring harness done. I've hit a light impasse in that I ran out of heat shrink tubing and can't do the battery/starter solenoid until the battery box is sorted a bit better. What I don't have finished yet...
-Temporary wiring to test the stock (but likely broken) electronic advance.
-Tail/turn light assembly connectors.
-R/R connectors (includes stater to R/R wires)
-Blinker relay (just need to buy one)
-Battery wires
-Starter solenoid (needs ground and battery/starter motor wires)
Here's the battery box area. The heavy wires for the battery/starter motor will all need trimmed/routed. You can also see where the harness ends behind the battery box. This is where the tail assembly will connect. It's all currently held together with reusable zip ties.
And here is the front end. You can see the ignition switch, plate to hang the blinker relay, and blinker indicator. The mass of wires below/behind the ignition switch is where the controls half and frame half of the wiring harness come together (but aren't currently connected).
So for the moment I broke into the carbs. A couple of the screws holding the CV boot covers were, nicely put, stuck. I managed to twist an impact bit trying to get them out and was sincerely worried I might crack one of the carb bodies. I didn't want to use heat/penetrating solvents for worry of harming the CV boots. Fortunately they all came loose in the end. However, I've hit another slight impasse. The Dynojet kit is missing a slide weight and they sent me only half the instructions. I'll have to contact them on Monday to get it straightened out.
Carb with impact driver. Because reasons.
On the plus side, I got the new tires mounted. Just that has helped the bike look more like a bike. Once the carbs and wiring harness are completely sorted, I'm going to see what kind of magic I can work on that rusty old tank. I was going to do that last, but have decided to get the bike running before pulling the motor out to clean up the frame. I also want to see if the ignition box is functional before putting in the Dynatech.
Latrans- Posts : 976
Join date : 2011-03-29
Age : 40
Location : the quiet place with the matresses on the walls
![]()
![]()
Re: I'm Turning Wrenches!
![]() Latrans Mon Apr 25, 2016 1:59 am
Latrans Mon Apr 25, 2016 1:59 am
A quick attendem to the last post: Getting the fuel needle pistons apart was a bit of a head-scratcher but I finally got it sorted. The service manual says to use long nosed pliers, but the forces I was using (and the pliers teeth) were starting to mar the (30 year old!) plastic. After a bit of thinking I came up with this solution:
https://img.photobucket.com/albums/v204/gundamzuki/Removal.jpg
I pulled the holder plate off the CV boot and slipped the piston back into its slot. Then, carefully wedging two flat-head screw drivers between the piston and the plate, I twisted in opposite directions. Worked SO much better than trying to use pliers. And didn't mar the plastic either.
Here's a couple reference pictures I took before I figured this thing out:
https://img.photobucket.com/albums/v204/gundamzuki/CV%20Pistons.jpg
https://img.photobucket.com/albums/v204/gundamzuki/Pistons%20Top%20and%20Bottom.jpg
Latrans- Posts : 976
Join date : 2011-03-29
Age : 40
Location : the quiet place with the matresses on the walls
![]()
![]()
Re: I'm Turning Wrenches!
![]() Latrans Mon May 23, 2016 2:28 am
Latrans Mon May 23, 2016 2:28 am
Sorry about the long silence, life's been busy. Between only having the weekends to do things and having more things than just this bike to do, it's taken me a while to get to some things.
First off, a clean and uncluttered work space will help any project beyond words.
Something almost exactly NOT like this is ideal.
But as you can see in that photo, I finally got around to fixing up the carbs. Full dip and scrub, new o-rings and a Stage 3 jet kit.
Made the darn things look practically brand new.
I also did some more work on the wiring harness. The R/R is connected. The tail assembly is sorted out. And a couple grounding leads I hadn't done yet are now finished. I haven't whipped up a temp-harness for the old ignitor box, yet and still need to finish cleaning up and mounting the battery box before doing the heavy battery/starter wiring. The battery box has had all the extra tabs and brackets cut off and just needs some dings filled in before painting. With a little luck, it'll be something I can do this week. And then this weekend I can get it actually mounted under the seat.
In other news, I did get a "new" work bench almost finished. The particle-board-and-counter-top one I've got is functional, but I wanted something I could pound on without breaking. I just need to put the top together (it's only set there at the moment) and add a lower shelf to help support the legs.
Recycled swing/play set wood is good stuff!
Latrans- Posts : 976
Join date : 2011-03-29
Age : 40
Location : the quiet place with the matresses on the walls
![]()
![]()
Re: I'm Turning Wrenches!
![]() Latrans Mon May 30, 2016 4:01 am
Latrans Mon May 30, 2016 4:01 am
I didn't get to painting the battery box, but did decide to just mount the darn thing. Keep in mind, I haven't welded in almost 20 years (freshman in high school) so I'm quite pleased that I didn't totally screw it up!
First I tacked on the starter solenoid mount.
After some fiddling with a hammer and my "new" bench vice, the box fit where i wanted it.
So I tacked it in place.
And trimmed off the extra.
A bead along the new edge, some work with a flap wheel and then a shot of primer finished it off.
Repeat for the other side, and the battery box is mounted!
I then ran and trimmed the battery wires. Right now the battery is in the bike and hooked up, but I have yet to add electrolyte to it. It's just there to make sure I have everything measured at least half right. Tomorrow I'll do the temp wiring for the old ignition box and then see if it will be willing to crank when I push the magic button. Hooray for three day weekends!
Oh, and next weekend I'll be worthless on this project because I'm taking my ladyfriend and younger daughter to Comicon. Because we're nerds and that's how we roll.
Latrans- Posts : 976
Join date : 2011-03-29
Age : 40
Location : the quiet place with the matresses on the walls
![]()
![]()
![]()
Page 1 of 1
Permissions in this forum:
You cannot reply to topics in this forum|
|
|